Setting up a Django Project

Do you love Django? I love Django too 🍻. I love it for reasons well documented on Django's Documentation and of course the documentation itself. Let's conclude its a loop. Django tag line is - 'The web framework for perfectionists with deadlines' in a couple of minutes, you will get to see it is not just Django bluffing. We will go through setting up a Django project and in a series of more blogs deploy our app to production 🚀. If you are excited as I am let's dive in.
Assumptions made:
- You have python installed in your system.
- You are excited.
Step 1: Create a Project folder
You can navigate to the directory where you keep your code projects or just somewhere in your computer that you can easily access. My personal favourite is VsCodeProjects directory. That is my residence address for code projects on my personal computer. To create the folder that will house our project, on the terminal run:
mkdir my-django-app
Now switch to that folder, folder name could be your name of choice, here I chose my-django-app the name doesn't really matter to Django. While inside that folder we can begin step 2.
Step 2: Create a Python virtual environment
If you haven't switched the terminal to your directory you can do so by running, cd my-django-app. While there let us create our virtual environment, run:
python3 -m venv venv
The second venv in the command is our virtual environment name. It just needs to be a name that describes what the folder contains. Next is to activate it, run:
source venv/bin/activate
The venv in here is the name of your virtual environment. Once activated we can now install the Django package without worrying about littering having other projects we create from now on having the Django package when they don't need it. It's a good practice working from a virtual environment when you are going to install other Python packages.
Step 3: Installing Django package
This is going to be swift just run:
pip install django
That command will install the latest Django release. That's all 😎.
Step 4: Creating a Django project
Now that we have Django installed, it's time to test drive. ⚠ We are about to go from 0-100 real quick! Why do I say that you ask? Well, my friend, Django is about to fill our empty directory with a whole lot of setup code. Still asking how, run:
django-admin startproject myfirst .
And just like that, we have:
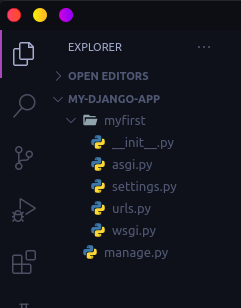
In the above command take note of dot . at the end of the command. It tells Django, 'I know you love setting up project folders and files for me but create a project named myfirst and put its files and folder just here in inside this directory. What would have happened if we did not provide the . is that another a directory called myfirst would be created. And inside that directory, another directory called myfirst which now contains other python files would have been created also. Setting up your project like that is not a problem. This just saves you having to run another cd command 😉, that's a pro tip.
Am thinking whether there should be a step 5 🤔. Because we are done here, mission accomplished!!
Ooh, wait we have not yet tested our rocket launch. So step 5 makes it to the list, yaaay🎉🎉.
Step 5: Check our development server works
I hope your terminal prompt is still on our project root, run:
python manage.py runserver
The manage.py file on our directory root, lets us interact with Django in the command-line in various ways e.g starting our server as we just did.
The output on your terminal will be similar to this:
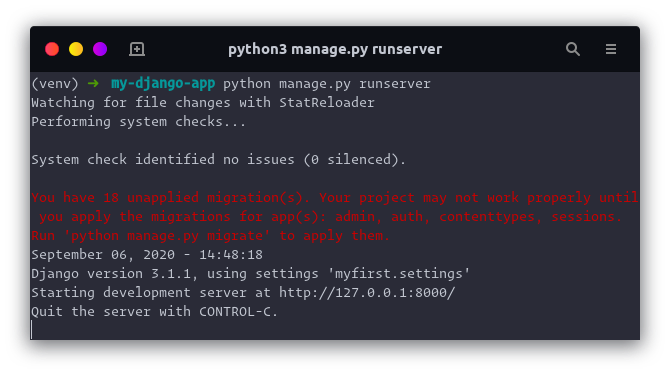 Don't worry about the migration warning, it's not an error; its a warning. And you know what we do with warnings 😁. Anyways we will be handling that warning later, for now, let's see our launched rocket.
On the terminal click on the link provide or open your browser enter
Don't worry about the migration warning, it's not an error; its a warning. And you know what we do with warnings 😁. Anyways we will be handling that warning later, for now, let's see our launched rocket.
On the terminal click on the link provide or open your browser enter 127.0.0.1:8000. And 🥳🥳🥳 we have our rocket launched ready for Mars.
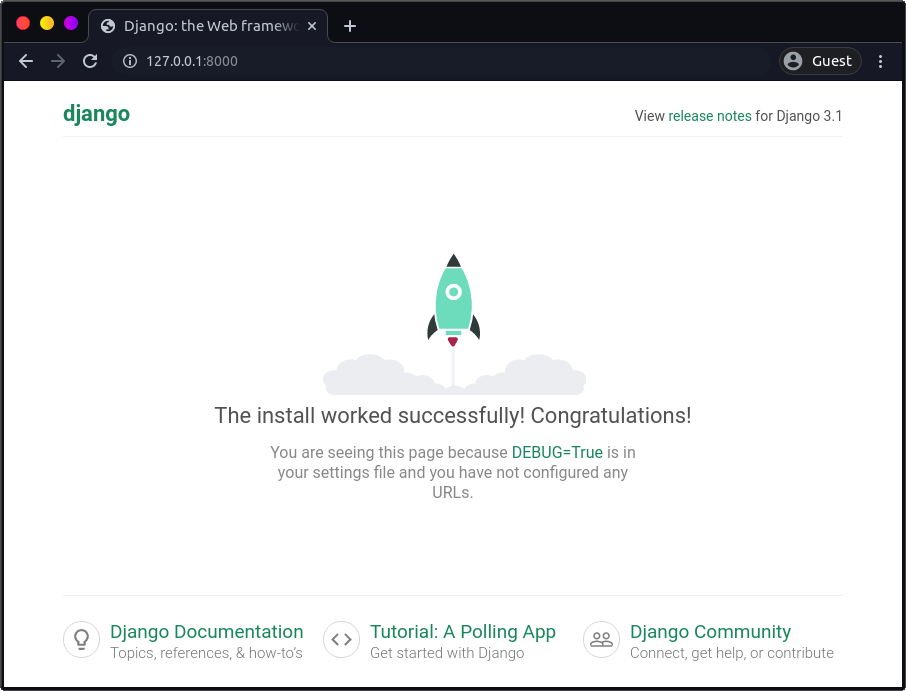 I remember the first time I saw this I couldn't hide my excitement 😁😁😁. I went ahead and posted it on twitter to let the world know I can set up a Django project. Spread the good news too, this is the beginning of a good thing.
Thank you for sticking around. Next, we will set up an app on our Django project. If you want to get more or read ahead 😁😁 you can check the Django Documentation. You can leave your questions or comments on the spaces below 😊 or just say Hi!👋

